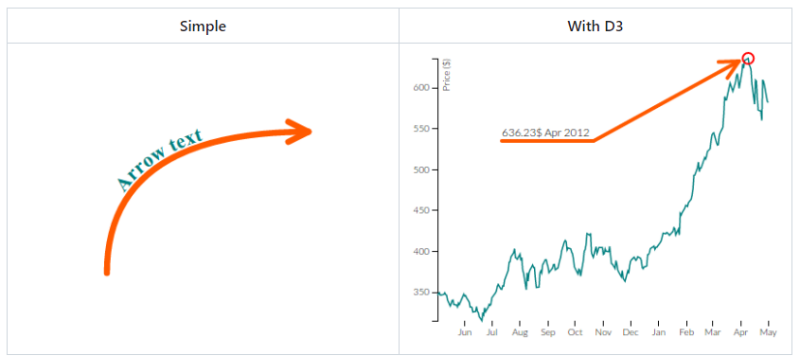
yarrow는 HTML5 기반의 SVG 화살표 애니메이션 자바스크립트 라이브러리다.
업데이트가 된 지 7년이 된 것으로 봐서 더 이상 개선은 없는 것 같지만, Source와 Target까지 애니메이션으로 움직이는 화살표를 그려준다는 점 때문에 필요에 의해 사용해 보게 되었다.
설치 방법
npm install yarrow
또는 아래 소스코드를 다운받아서 HTML <head></head> 사이에 넣으면 된다.
<link href="node_modules/yarrow/build/yarrow.css" rel="stylesheet" type="text/css"/>
<script src="node_modules/d3-selection/build/d3-selection.min.js"></script>
<script src="node_modules/svg-path-utils/build/svg-path-utils.min.js"></script>
<script src="node_modules/yarrow/build/yarrow.min.js"></script>
기본 사용방법
var arrow = yarrow.arrow({
  x1: 0,                // source x coordinate
  y1: 0,                // source y coordinate
  x2: 100,              // target x coordinate
  y2: 100,              // target y coordinate
  text: "I'm arrow!"    // arrow label
});

// render arrow on the page
arrow.render();

// dispose arrow with duration=1000 after delay=500
arrow.dispose(1000, 500);
또는
yarrow.arrow({...}).render().dispose(1000, 500);이렇게 사용한다.
상세한 사용방법은 아래 yarrow github 참조
https://github.com/krispo/yarrow#readme
GitHub - krispo/yarrow: svg animated arrow pointer and tooltip
svg animated arrow pointer and tooltip. Contribute to krispo/yarrow development by creating an account on GitHub.
github.com
yarrow 활용 예제
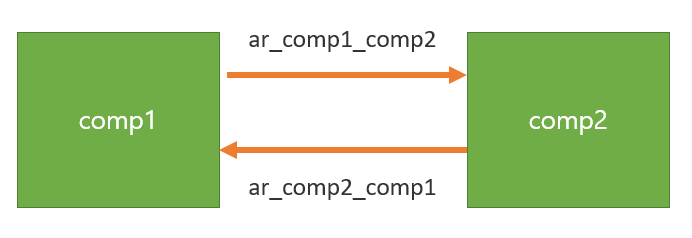
약 20여 개의 화살표를 동시에 그린다던지, 동시에 사라지게 하는 등 각각 또는 일괄적으로 화살표를 컨트롤해야 할 필요가 있었기 때문에 기본 기능 외 추가로 활용할 수 있는 코드를 작성했고, 아래 예시와 같이 comp1과 comp2를 연결하는 좌에서 우, 우에서 좌로 연결하는 화살표를 그렸다. github에는 jquery를 사용하지 않았는데 jquery를 활용해서 코드를 작성했다.
객체 생성
<script src="./js/svg-path-utils.min.js"></script>
<script src="./js/d3-selection.v0.6.min.js"></script>
<script src="./js/yarrow.min.js"></script>
<script src="./js/arrow.js"></script>
<script>
    var yarrow = new yarrow.Yarrow();
    var yarrowTracker = [];

    var ar_comp1_comp2, ar_comp2_comp1;
</script>
우선 yarrow 객체를 생성하고, yarrowTracker라는 Array도 하나 생성했다. yarrowTracker는 화살표를 그릴 때마다 해당 배열에 추가해 주고, 화면에서 삭제될 때마다 배열에서 삭제해 주었다.
그리고 ar_comp1_comp2 등과 같은 변수는 component1과 coponent2를 연결시켜주는 화살표라는 의미로 실제 yarrow 화살표를 담을 변수이다.
화살표를 그려주는 함수
<script>
    function render_arrow(key){
        if(key == "ar_comp1_comp2"){
            yarrowTracker.push("ar_comp1_comp2");
            ar_comp1_comp2 = yarrow.arrow({
                x1: function(_){ return _.source.left + _.source.width;	},
                y1: function(_){ return _.source.top + (_.source.height/2) - 40; },
                x2: function(_){ return _.target.left; },
                y2: function(_){ return _.target.top + (_.target.height/2) - 40; },
                source: "#comp1",
                target: '#comp2',
                text: "something",
                //textDx:1,
                textDy:-10,
                textStartOffset: 10,
                arrowStyles: { 'stroke-width': 2,'stroke': '#666666'},
                textStyles: { 'fill': '#666666', 'font-size': 12,'font-weight': 'bold'},
            }).render();

            $("#" + ar_comp1_comp2.id + " .arrow.tip-1").attr("d", "m0,0 l-10,-5");
            $("#" + ar_comp1_comp2.id + " .arrow.tip-2").attr("d", "m0,0 l-10,5");
        }else if(key == "ar_comp2_comp1"){
            yarrowTracker.push("ar_comp2_comp1");
            ar_comp2_comp1 = yarrow.arrow({
                x1: function(_){ return _.source.left; },
                y1: function(_){ return _.source.top + (_.source.height/2) + 40; },
                x2: function(_){ return _.target.left + _.target.width; },
                y2: function(_){ return _.target.top + (_.target.height/2) + 40; },
                source: "#comp2",
                target: "#comp1",
                text: "something2",
                textReverseDirection: true,
                textStartOffset: 90,
                arrowStyles: {'stroke-width': 2,'stroke': '#ccc'},
                textStyles: {'fill': '#ccc',   'font-size': 12,  'font-weight': 'bold'}
            }).render();

            $("#" + ar_comp2_comp1.id + " .arrow.tip-1").attr("d", "m0,0 l-10,-5");
            $("#" + ar_comp2_comp1.id + " .arrow.tip-2").attr("d", "m0,0 l-10,5");
        }
        ...
    }
</script>
render_arrow라는 함수를 만들고 화살표 아이디를 파라미터로 설정해서 실제 화살표를 그려주는 곳에서 오브젝트 key 값을 넘겨주면 해당 key에 맞는 화살표를 rendering 하게 된다.
각 화살표가 그려질 때 총 3가지 작업을 해 주었다.
- if문에서 조건이 맞는 키를 찾아서 yarrowTracker에 id 값을 push로 추가
- 기본 yarrow 사용 방법에 따라 yarrow.arrow를 정의 (추가 옵션은 yarrow github나 demo page 참조)
- $("#" + ar_comp2_comp1.id + " .arrow.tip-1").attr("d", "m0,0 l-10,-5"); 와 같이 일부 화살표 크기를 화면에 어울리게 조정
그리고 화면에 화살표를 그릴 때는 아래와 같이 render_arrow 함수를 호출해줬다.
render_arr("ar_comp1_comp2");

setTimeout(function(){
    render_arr("ar_comp2_comp1");
}, 300);
이런 식으로 하면 오른쪽으로 가는 화살표를 그려준 후 왼쪽으로 가는 화살표를 그려준다.
화면에 그려진 모든 화살표를 없애는 함수와 지정된 화살표만 없애는 함수
function disposeAll(){
	yarrow.disposeAll();
	yarrowTracker = [];
}

function dispose_arr(key){
	if(key == "ar_comp1_comp2"){
		ar_comp1_comp2.dispose();
	}else if(key == "ar_comp2_comp1"){
		ar_comp2_comp1.dispose();
	}
}
이 부분은 간단하지만 한 가지 주의 사항은 dispose_arr는 아래 removeArrFromTracker 함수에 의해서만 호출해야 현재 화면에 그려져 있는 모든 화살표들을 정상적으로 tracking 할 수 있다. 즉, 화면에서 직접 dispose_arr 함수를 호출하면 안 된다.
화면에 그려진 화살표 중 여러 개의 지정한 화살표만 없애는 함수
function removeArrFromTracker(ids) {
	for(var i = yarrowTracker.length-1 ; i >= 0; i--){
		for(var j = 0 ; j < ids.length; j++){
			if(yarrowTracker[i] == ids[j]){
				dispose_arr(yarrowTracker[i]);
				yarrowTracker.splice(i, 1);
				break;;
			}
		}
	}
}
ids는 배열값으로, 지워야 하는 화살표를 여러개 배열에 담아서 호출하고, yarrowTracker에서 해당 id 값 제거
var ids = ["ar_comp3_comp5", "ar_comp5_comp6", "ar_comp6_comp7"];
removeArrFromTracker(ids);
별로 필요 없을 수도 없는 이런 함수들이 필요했던 이유는 svg로 화살표가 그려진 이후에 화면 사이즈가 바뀌거나 component 들의 위치가 변경했을 때, 현재 그려져 있는 모든 화살표들을 한 번에 다시 그려줘야 했기 때문이다.
화면에 그려져 있는 모든 화살표를 다시 그리는 함수
function renderAllActive(){
	tmpyarrowTracker = yarrowTracker;
	yarrowTracker = [];

	for(var i = 0 ; i < tmpyarrowTracker.length; i++){
		yarrowTracker.push(tmpyarrowTracker[i]);
		render_arr(tmpyarrowTracker[i]);
	}
}
화면 사이즈가 변경되면 아래와 같이 모든 화면상의 화살표를 다시 그려줬다.
$(window).resize(function(){
	yarrow.disposeAll();
	renderAllActive();
	console.log("window resized");
});
마치며
css 화살표나 다른 여러 가지 svg 화살표 애니메이션들이 많이 있지만 yarrow는 오브젝트와 오브젝트를 연결해 주는 화살표를 애니메이션으로 그려준 다는 점은 개발시간 단축에 도움을 많이 주었다.
화살표를 absolute로 화면에 그리기 때문에 화면의 사이즈 변경이나 물체의 크기 변경 시 화살표는 그대로 남아 있는 점이나 화살표 위에 써지는 글자들이 화살표 사이즈보다 커지면 글씨가 잘리는 점 등 개선사항이 많이 있어 보이지만 더 이상 개선은 되지 않는 것으로 봐서는 필요한 기능과 부합할 경우에 사용해 볼 만 자바스크립트 라이브러리다.
http://krispo.github.io/yarrow/
Yarrow — svg animated arrow pointer and tooltip
Styles also can be defined via css. .arrow { ... } .arrow .tip1 { ... } .arrow .tip2 { ... } .arrow .text { ... }
krispo.github.io
'개발 기록 > Javascript' 카테고리의 다른 글
| Javascript/jQuery - Access Token 자동 갱신 소스코드 (0) | 2023.06.12 |
|---|---|
| [Javascript] 정규식 공백 제거, 사업자 번호 검증, 숫자를 한글 금액으로 (0) | 2023.05.23 |
| Javascript 키코드 특정 키 입력 방지 (0) | 2023.05.22 |
| [Javascript] 페이징 소스코드 - jQuery, Ajax, and Bootstrap5 (0) | 2023.05.22 |
| [Javascript] 팝업창 만들기 - Window.open() (0) | 2023.05.11 |